Create a game in javascript with kiwi.js
I’ve never been too much into games, but I went to one of the wellington.js meetups and saw Ross Kettle, one of the guys behind kiwi.js, giving a talk about making games with javascript. It looked super easy and super awesome, so I decided that I’ll give it a go.
The kiwi.js is a framework that gives you all the necessary tools to create simple 2D or 3D games. It’s an open-source project and I recommend you to check it out, because it’s easy to use, has a good documentation and nice tutorials.
Let’s sink in and write a small 2D game with an angry imp smashing things with his gigantic fork accompanied with excellent sound effects and wonderful soundtrack.
Initial skeleton
The initial template for a game consist of a Kiwi.Game object and multiple states. For our example we would need just one Kiwi.State defined, so let’s tied the two together.
<html>
<body>
<script src="kiwi.js"></script>
<script type="text/javascript">

var game = new Kiwi.Game();
var state = new Kiwi.State('state');

state.preload = function(){
  Kiwi.State.prototype.preload.call(this);
}

state.create = function(){
  Kiwi.State.prototype.create.call(this);
}

state.update = function(){
  Kiwi.State.prototype.update.call(this);
};

game.states.addState(state, true);

</script>
<style>
body { background: black;}
body > div { margin: auto;}
</style>
</body>
</html>
The state object has 3 important events; the first one preloads the assets, the second one defines transformation, animation and placing them to the game, and last one is responsible for updating the canvas with new information and it is called 60 times a second.
With this code, we’ll get a solid foundation for the game — an empty canvas in the middle of the screen.
Adding imp
What game would it be without an angry red coloured imp? So, we’ll add one right now.
To do so, we have to add a sprite to the state. The sprite is an image, PNG usually, that may contain several animations of an object.
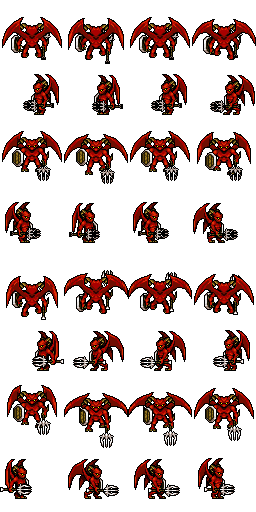
There is a slightly different animation on each line and it is composed of four distinct key frames. The first animations are for movement in different directions and the latter ones serves as attack animations.
Next thing we have to do is to add all animations to the game engine and its state. Firstly, we need to add our perfect imp as an asset and bind it to the canvas as a Kiwi.GameObjects.Sprite.
state.preload = function(){
  Kiwi.State.prototype.preload.call(this);

  this.addSpriteSheet('angry-imp', 'character.png', 64, 64);
}

state.create = function(){
  Kiwi.State.prototype.create.call(this);

  this.character = new Kiwi.GameObjects.Sprite(this, this.textures['angry-imp'], 50, 50);
  this.addChild(this.character);
}
After that we define glorious animations and for each of them we specify relevant keyframes and bind them to character class — it’s simple enough a little imp child could do it.
state.create = function() {
  Kiwi.State.prototype.create.call(this);

  this.character = new Kiwi.GameObjects.Sprite(this, this.textures['angry-imp'], 50, 50);

  this.character.animation.add('idle-left', [4], 0.1, false);
  this.character.animation.add('idle-right', [12], 0.1, false);
  this.character.animation.add('idle-up', [0], 0.1, false);
  this.character.animation.add('idle-down', [8], 0.1, false);

  this.character.animation.add('move-left', [4, 5, 6, 7], 0.1, true);
  this.character.animation.add('move-right', [12, 13, 14, 15], 0.1, true);
  this.character.animation.add('move-up', [0, 1, 2, 3], 0.1, true);
  this.character.animation.add('move-down', [8, 9, 10, 11], 0.1, true);

  this.character.animation.add('attack-up', [16, 17, 18, 19], 0.1, false);
  this.character.animation.add('attack-left', [20, 21, 22, 23], 0.1, false);
  this.character.animation.add('attack-down', [24, 25, 26, 27], 0.1, false);
  this.character.animation.add('attack-right', [28, 29, 30, 31], 0.1, false);

  this.character.facing = 'right';
  this.character.animation.play('idle-right');
  this.addChild(this.character);
}
For an idle animation we are saying that it shouldn’t be looped, but for movement we need to play that animation over and over in a loop. The 0.1 parameter defines the speed of the animation.
Movement
Having all those beautiful animations prepared we should bind them to a keyboard events and gain control over our angry imp. Let’s define arrow keys for movement and space bar for his mighty and vengeful attack. Firstly, we initialize keys in the create function.
state.create = function() {
  ...

  this.leftKey = this.game.input.keyboard.addKey(Kiwi.Input.Keycodes.LEFT);
  this.rightKey = this.game.input.keyboard.addKey(Kiwi.Input.Keycodes.RIGHT);
  this.upKey = this.game.input.keyboard.addKey(Kiwi.Input.Keycodes.UP);
  this.downKey = this.game.input.keyboard.addKey(Kiwi.Input.Keycodes.DOWN);
  this.space = this.game.input.keyboard.addKey(Kiwi.Input.Keycodes.SPACEBAR);
}
And after that, we use the update function to check whether a key is pressed and if so we play an animation and move the imp in that direction. Or stab with that giant fork naturally.
state.update = function(){
  Kiwi.State.prototype.update.call(this);

  if (this.space.isDown) {
    this.character.animation.play('attack-' + this.character.facing);
  }
  else if (this.downKey.isDown || this.upKey.isDown || this.leftKey.isDown || this.rightKey.isDown) {
    if (this.downKey.isDown) {
      this.character.facing = 'down';
      if (this.character.transform.y < 536) this.character.transform.y += 3;
    }
    else if (this.upKey.isDown) {
      this.character.facing = 'up';
      if (this.character.transform.y > 3) this.character.transform.y -= 3;
    }
    else if (this.leftKey.isDown) {
      this.character.facing = 'left';
      if (this.character.transform.x > 3) this.character.transform.x -= 3;
    }
    else if (this.rightKey.isDown) {
      this.character.facing = 'right';
      if (this.character.transform.x < 736) this.character.transform.x += 3;
    }

    if (this.character.animation.currentAnimation.name != 'move-' + this.character.facing)
      this.character.animation.play('move-' + this.character.facing);
  }
  else if (this.character.animation.currentAnimation.name.indexOf('attack') != 0) {
    this.character.animation.play('idle' + this.character.facing);
  }
};
Wow! Angry imp is moving and he can frantically run around the screen. I could spend hours with my imp hitting imaginary walls and trying to stab air, but let’s get the game to another level…
Grandiose music
…by adding a super awesome soundtrack and tremendous sound effects of course. To do that, we need to add assets to the game and initialize the music. Let’s say we want a background music and a slashing sound of the fork. Firstly, we preload music files.
state.preload = function(){
  ...

  this.addAudio('background-music', 'background.ogg');
  this.addAudio('slice', 'knifeSlice.ogg');
}
Secondly, we associate a slice sound with our frantic imp and we start to play a music in the background.
state.create = function(){
  ...

  this.character.forkChop = new Kiwi.Sound.Audio(this.game, 'slice', 0.2, false);

  ...

  this.backgroundMusic = new Kiwi.Sound.Audio(this.game, 'background-music', 0.5, true);
  this.backgroundMusic.play();
}
And lastly, we have to play the fork chop sound when the space bar is pressed in the update call.
state.update = function(){
  ...

  if (this.space.isDown) {
    ...
    this.character.forkChop.play();
  }

  ...
}
Sweet, this is how you add music to the game and the game is getting more serious — AAA ambitions.
Physics and interaction
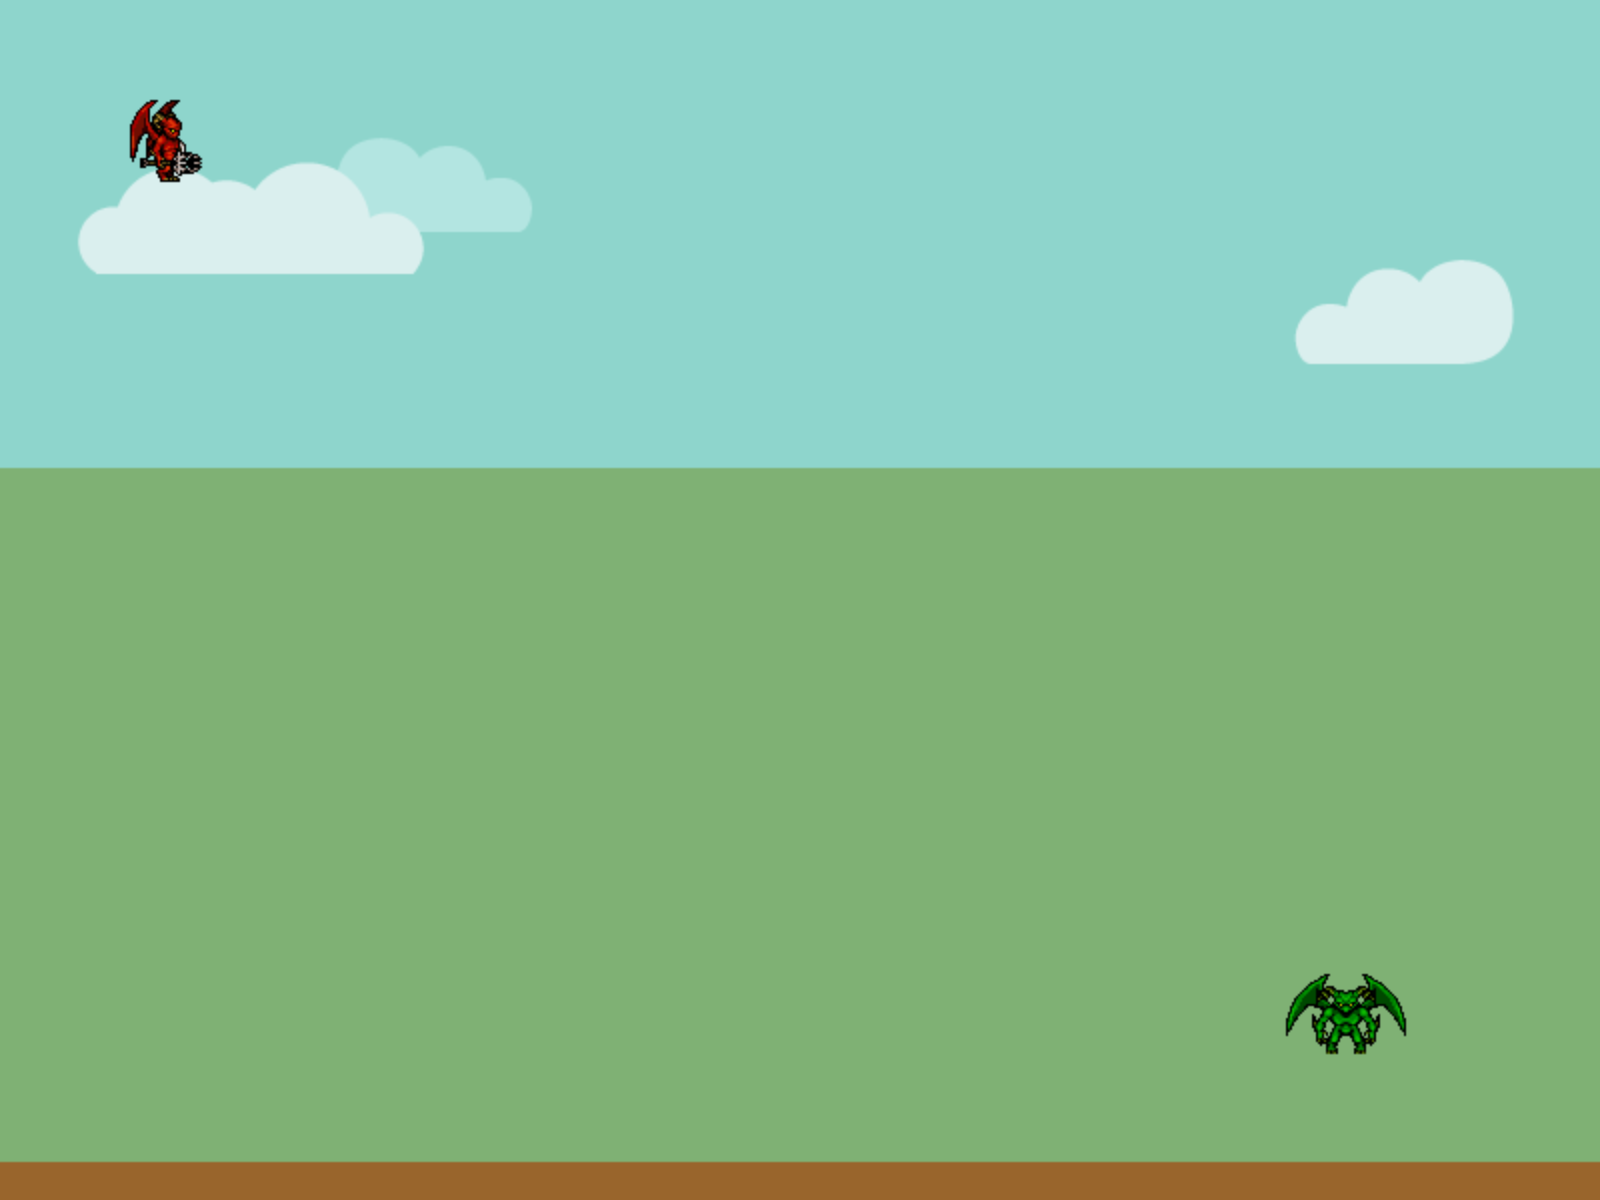
Because there is just one imp in the game it makes perfect sense to add another one. We had a red one, so the next one might be green and his role would involve standing calmly, chill a bit and eventually – die. For this reason, we have to add a new sprite with two animation; one for standing and chilling and another one for his sudden death, but I won’t go into details, because you can add such creature to the canvas yourself. In case of any troubles take a look at this commit.
It would be awesome if imps could interact with each other. Let’s say that when the angry imp sticks the green hippie one, the green hippie would die and disappear in an eternal purgatory.
For sending imps to that purgatory, there is a thing called arcade physics. First of all, we have to define a Sprite object extended by physics.
var SpriteWithPhysics = function(state, texture, x, y) {
  Kiwi.GameObjects.Sprite.call(this, state, texture, x, y);
  this.physics = this.components.add(new Kiwi.Components.ArcadePhysics(this, this.box));
  this.update = function() {
    Kiwi.GameObjects.Sprite.prototype.update.call(this);
    this.physics.update();
  }
}
Kiwi.extend(SpriteWithPhysics, Kiwi.GameObjects.Sprite);
When we are done with that we replace previous Kiwi.GameObjects.Sprite with the new class we’ve just created.
state.create = function(){
  ...

  this.opponent = new SpriteWithPhysics(this, this.textures['hippie-imp'], 640, 480);
  this.character = new SpriteWithPhysics(this, this.textures['angry-imp'], 60, 40);
As a last thing we have to define when the interaction happens, so let’s dig in to the update call and modify the fork chop code.
state.update = function(){
  ...

  if (this.space.isDown) {
    if (this.character.physics.overlaps(this.opponent)) {
      // send hippie imp to an eternal purgatory
    }
  }

  ...
}
And that’s it. We might play an animation of a dying imp and maybe a nice squeaking sound. If you are interested in the whole code of this demo take a look at github.
It’s been super fun and it didn’t take a lot of code to write the game. Also, you can check the result yourself and kill that bloody hippie!
Resources and credits
- Online demo
- Demo repository
- Creating a basic kiwi.js game
- Keyboard Input
- Sound in kiwi.js
- Arcade physics
- Imp by Stephen Challenger and William Thompson
- 8-bit JRPG soundtrack by Avgvst
- Death sounds by Dan Knoflicek
- Open game art